Thursday, May 21, 2015

New Website!

Hey All,

Our brand spankin' new website is up and running!! Click here to check out the fresh new look and waaaay easier navigation.


I worked with a very talented friend - Brad Raymond Creative - to come up with this look. I'm thrilled with his work.

Help me spread the word by visiting my Facebook Page and SHARING the post dated May 20th. Everyone who shares will be entered to win the luscious new colors of wool felt from National Nonwovens along with TWO Blueberry Backroads patterns - you choose your favorites!

And sign up for our newsletter on the bottom of the website so stay up to date. I'll be moving my blog over to the website, and sending out newsletters with the latest and greatest patterns, upcoming shows, prize giveaways, and more. Don't miss it!

Thank you all for exploring embroidery along with me. Leave me comments either on my blog or Facebook page, and let me know what you think!

Sara

Friday, May 1, 2015

Happy May Day!

Happy spring, and happy happy May Day!

April was a busy month at Blueberry Backroads. It's the month I make a big fat push to get new patterns completed and to the printer. Why? International Quilt Market! It's the big wholesale show that we in the quilt world vend at each year. It's where the creativity culminates! So I'll show you what I've been working on in a sec, but first... FLOWERS!

Just before Christmas my boyfriend and I got ourselves into a house, and my garden, once covered in snow, is beginning to bloom. Bloom, bloom, bloom...


The previous owner was a prolific gardener, and now I'm the lucky duck who gets to see what pops up. Perennials rock!

Back to embroidery. I released three new patterns a couple weeks ago, and now I'm finishing SEVEN... yes, seven more. They'll be available in a week or two. But here are the three that are up and running on my website!

Cherries Jubilee was inspired by that fabric. What's cuter than cherries? No, really...what? And I decided to incorporate a little bit of color crayon into the mix. If you follow my blog, you know it's become my new favorite thing. (How long before I need a new favorite thing...???)

Welcome Spring is one in a series... Welcome Winter is next - almost done!

Tweet! Chirp! This one was fun. I've been playing around with wool felt, and these lil' birdies are the result. I turned them into Christmas ornaments for my nieces, and then kept going. They're easy, fun, a lovely little gift.

And in getting ready for Market, I've really stepped up my kits. I've been cutting fabric, getting more and more kits and fabric on my website. It's been fun.

Those little bundles are wool felt pieces for Itty Bitty Birds. And on the right are strips I cut for Merry Little Christmas. I found that clothes rack a couple of years ago, and since my jeans don't fit, I found a much cuter use for it!

Today is the first day of the Virtual Fab Shop Hop. It's a cool opportunity to find out about other quilt shops and designers, visit their sites, see what's new, and... win prizes! There's this hippity hoppity bunny you can try to find on each page, and it enters you to win. Kinda fun - I like the interactive part of it.

So that's what's been happening on down the Backroads. I'm headed back to the sewing room to stitch away some more. Visit my website to see all my patterns, and stay up to date with what's new by Liking Blueberry Backroads on Facebook.

Happy May!
Sara

Wednesday, April 1, 2015

Frame Your Stitchery

Happy spring! 

It's always an exciting day for me when I get to release new patterns. Three new ones this week! Go to my website and check 'em out. They're at the top of the Spring & Summer Patterns page.

Which takes me to this blog post - I framed one of those new patterns, my first time trying it. I love the look. Here's what Welcome Spring! looks like in its cute little frame.

So I thought I'd take you through how I did it. There was some trial and error, and fingers very sticky with fabric glue, a little swearing...but eventually I got it.

Here's what you'll need: Some fairly stiff cardboard and a box cutter, a multi-purpose adhesive, thumb tacks, nice paper for the back, a stitchery with room around the edges to frame, and your frame! But of course. The type of frame I used has that nice groove on the back to place your stitchery. Oh, and you'll need a pencil and tape measure which I forgot to place in the picture.

Full disclosure here... my camera was full, stopped taking pictures, and I didn't notice until much later. I thought it was being "weird" and I switched to another camera. Oops! But I'll explain, and we'll get back to photos in a bit. I promise.

Measure the dimensions of that groove on the back of the frame, draw the same size rectangle onto your cardboard, and use your box cutter to cut it out. See how it fits, and cut it down if need be. It shouldn't be too tight, as you'll need a little room for the fabric to fit in there.

Next place your fabric atop the cardboard and fuss around with it until you have it nicely centered. Once it looks just right on the front (and this can take quite a bit of fussing), lay it down, and use your pencil to trace around the cardboard so you know right where it goes. 

Lift up the cardboard, and spray that adhesive onto the fabric. Lay the cardboard back down within those traced lines, and flip it over to make sure everything landed where you wanted it to. If not, no big deal. The adhesive isn't super glue, and you can repeat until it's to your liking.

Back to the pictures! Place the whole thing into your frame, and again - look at the front to make sure you're all nice and centered.

Once everything is positioned just as you want it, let the adhesive dry... yeah right! Ok so that would be the right thing to do. Me, I get excited to see the end result, and don't wait. Don't be like me. Let your adhesive dry. 

THEN, get out those thumb tacks and secure that baby down. Pierce right through the fabric, into the wood in that groove. Keep peeking at the front to make sure things haven't shifted. 

Now cut away all that extra fabric, leaving just enough to tack down to the back of the frame. Be careful not to pull too hard because the fabric can still shift. Only because you didn't let your adhesive dry! Or maybe you did... good job if you did.

Now cut out a piece of paper just a bit smaller than your frame. Cue that elusive tape measure and pencil.

Place the paper over the back of the frame, and tack down, making sure to catch the fabric with each tack. Now you have a pretty nice looking back! You just need to add a hanger, of which there are maaaannnnny types at your local hardware store. 

But how does the front look? Ta da!

And there you have it. Now I'm sure there are many ways to skin this cat, but this worked for me, and was pretty painless, definitely inexpensive. 

Frames and more stitcheries are on my website - stop on by! And visit my Facebook page to see what else I've been working on lately. 

Happy stitching in the sunshine!
Sara

Tuesday, March 17, 2015

Sticky Fabri-Solvy

Hey All!

Happy happy spring! I am looooovin' on this Minnesota sunshine and inspired to work on a spring pattern with cute little birdies.

I recently discovered this super handy product from Sulky - Sticky Fabri-Solvy. It's a self-adhesive, water soluble stabilizer that's shown here in sheets. You can print or trace your design onto your fabric (or in this case, wool felt). It has tons of uses - a stabilizer, templates (which is what I'll be using it for in this post), and as a way to transfer an embroidery design onto dark fabrics or wool. Awesome right??!! I do agree. I do so so agree.

So let me show you how it works. I first printed my designs onto a sheet of the Fabri-Solvy. It's printer friendly which rocks because I need to make A LOT of little birds for this pattern and did not feel like tracing them all out. BUT you certainly can trace out any pattern you like. Throw it over a light box or up against a sunny window, and use a Pigma pen or water soluble fabric pen to trace out your shapes.

What shall we schtick it to...?? I'm making these little birdies out of wool felt. Today I choose...amarillo!

Cut your shapes out just beyond the traced lines. (If you use fusible web for applique, you'll find this to be basically the same process). Cut, cut, snip. Cut, cut, snip.

Peel away the release sheet...

And schtick it to your wool felt (or wool, or fabric, or...)

Adhere all those little pieces, and cut them out on the lines.

Once cut out, pull away the sticky stuff, and your shape emerges! Chirp!


Now what's really cool is that sticky stuff stays sticky for a few more rounds. I'll use the same little templates to cut out bluebirds next. Again, just adhere your shapes to the wool felt, and this time you'll cut along the edge of each shape. You can also pin your template in place once the stickiness is gone. Or... go to your printer and just print another sheet of birdies.


That's all there is to it. Easy, right? And because it's water soluble, you can stick it to dark fabric, wool, whatever, embroider right on top of it (hand or machine), and it dissolves away in warm water when you're done. Super cool. Just be sure both your fabric and thread are colorfast.

Tweet tweet say the goldfinch. Chirp chirp say the bluebirds.

Click here to visit my website for fun embroidery patterns. And stay up to date on new patterns (this one's coming sooooon!) by LIKING Blueberry Backroads on Facebook.

Happy spring!
Sara

Wednesday, January 7, 2015

Double Sided Door Draft Stopper

HAPPY HAPPY NEW YEAR!

It is COLD right now in Minnesota. I mean 25 degrees below zero plus some nasty wind COLD! So I decided to do a little "functional" sewing today and make up a double-sided draft stopper for our front door. Full disclosure - I don't do a whole lot of "functional" sewing. I embroider cute little birds and happy little snowmen. I can sew a button... maybe repair a torn seam... but that's about it. So this was a nice little challenge for me. I got to use the tape measure. I even hooked it to my belt... makes a girl feel important, you know? :)

So step one is to get that tape measure out, and measure the length of your door. Then measure the width of your door. Jot those numbers down and...

Take yourself into that freezing cold wind and purchase some "outdoor fabric". That's what it's called. Upholstery fabric or anything like that would work well too. Choose something to match your furniture or that will blend well with the floor. My door measures just shy of 2" in width, and a 1/2 yard of fabric was exactly enough. Maybe get a little more if you want to play around with it.

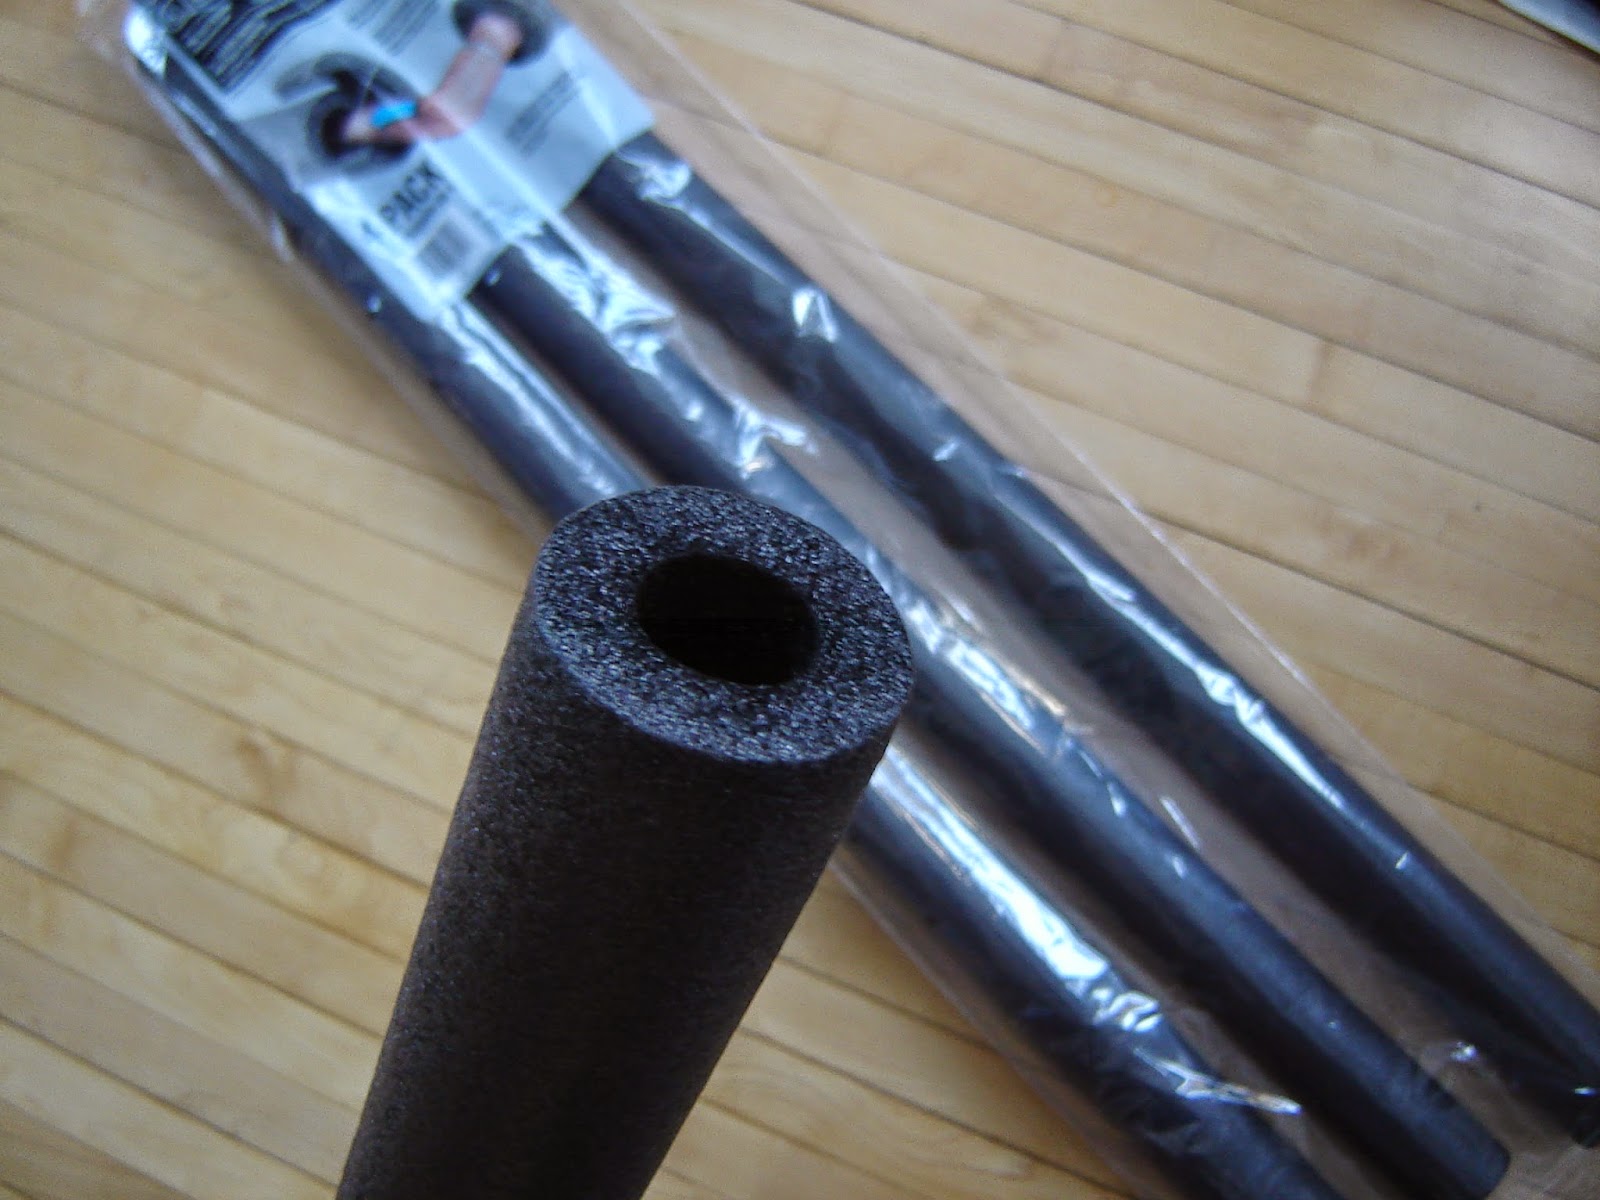
You'll also need a couple of pipe covers. Pick these up at any home goods store, WalMart, wherever. You want ones that are almost as long as your door. My door is 36" across, and so are these pipe covers. I'll actually cut them down a bit to allow me to open and close my door - a critical piece, don't you think?

Give your outdoor fabric a nice gentle wash, and air dry. I just threw mine over the radiator, and it was dry in 10 minutes.

Cut your fabric like this:
Length: The length of your door, plus about 3". My door is 36" so I cut my fabric to about 39".
Width: Cut to about 18". Again, my door is just shy of 2" in width, and 18" worked well. It's not a super tight fit, but seems about right.

And don't worry about getting technical. Remember, this sits on your floor, and gets batted around by the dog. Approximates are a-okay!

Fold RIGHT SIDES OF FABRIC together along the long edge. Pin one long edge and one short edge in place. Use pretty pins because you'll blog about this later.

Kindly ask your kitty to get out of your sewing chair...

And sew one long edge and one short edge. I sewed over each twice, just because of that whole sitting on the floor, dog batting it around thing. I want it to be durable!

Turn your door draft stopper, and toss those pipe covers inside.


Quick trial run to see how it fits! See here how my pipe covers are too long. I'll need to cut those down so that the door can open and close easily.

Cut those pipe covers down to your liking. I cut mine to measure about an inch less than my door.

Now pull out the pipe covers, and fold your draft stopper in half just to create a little crease down the middle. Eyeball it, and then sew right down that crease. Somewhere CLOSE to the middle is just fine!


Stop short 3" or so from the end.

Pop those pipe covers back in, and cut off excess fabric, leaving yourself enough to sew up the end.

Tuck those loose ends in, any which way you can. I sort of made a little present at the end. Sew up with some sturdy thread, and voila!


Ok, almost voila. My ends puckered a little and were getting stuck in the door. So I just folded them in, and sewed them to the bottom. Easy little fix, and you can't see it from the top.

Now for real, voila! Bye bye draft. Don't you love that rug in the entryway? A Christmas present from my mom; she made it herself! You'll have to ask her how she did that... I'm just the door draft stopper girl.

There you are, a fun and inexpensive little do-it-yourself-er. I'm going to use that striped fabric to make a door snake for an interior door. That should be even easier... I'll just make the pocket, fill it with rice, and sew up.

Happy stitching, and STAY WARM!!
Sara